
Running a quiz website and even making money with it is not as difficult as you might think. Because so many people asked me how to do it I decided to create this step-by-step beginners guide, the steps are linked so feel free to skip what you already know.
Here is the list of steps needed to create a WordPress Multiple choice Quiz:
- 1. How to choose a domain name
- 2. Find a reliable hosting provider
- 3. Installing WordPress
- 4. Accessing your backend
- 5. Customize your WordPress installation
- 6. Automate the installation of plugins
- 7. Configure the plugins
- 8. Create your first quiz
- 9. Import quiz questions
- 10. Show the quiz on your website
- 11. Where to go from here?
1. How to choose a domain name
Choosing a domain name (The name of your quiz website like https://www.myawesomesuperquiz.com) is probably the most important step of all. You want your Quiz to be found and the website name to be memorable. But what makes a good domain name and how to check it?
Yes, it still should be .com
Why? Because most people expect it to be. When your quiz website goes viral and people share the name like “Hey you need to try the quiz on ‘MyAwesomeSuperquiz’ people who want to go there will most likely type in myawesomesuperquiz.com. But aren’t all the good .com names already taken? How can you ever find a free one?
Using Bustaname to find your perfect domain name
Whenever I want to get a new domain name I am using the website to quickly check what is available and to get new ideas and word combinations I did not think of.
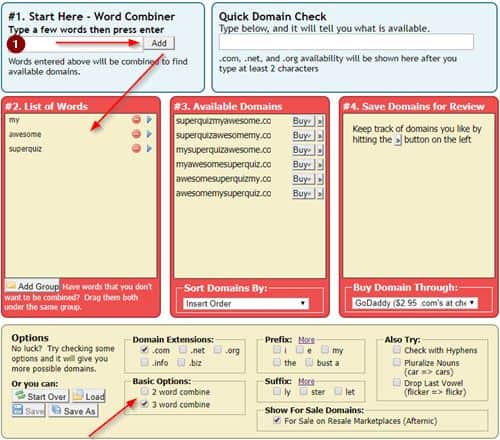
First, pick a couple of good keywords that characterize your quiz website. Don’t get too fancy, pick something so people who see your domain name immediately know what they will find. This is even more important for Google, the clarity of your websites name is an essential part to rank high in searches. Enter the keywords one by one and press add. The words will show up in the list below and bustaname automatically shows available websites with all word combinations. If you enter more than 2 words make sure to tick the “3-word combine” option. If nothing shows up in the available domains section you can try to substitute your keywords. Press the red minus icon next to each word to get synonym suggestions. So far bustaname always found a suitable domain name because there are just endless possibilities.
2. Find a reliable hosting provider
Finding what? A hosting provider is a company the hosts your website which means all the data and web pages are stored on their computers. But they are not just online storage, hosting providers make sure your website is served as fast as possible and reachable (means they assure that their computer (servers) are always up and running, protected against hackers and so on. There are hundreds if not thousands of companies to choose from, so which one should you pick? My recommendation is to pick the one most people pick (for the reason being so easy to use, affordable and reliable) which is Bluehost. They always have special offers where you can get a website for less than 5$ (sometimes less than 3$) per month. These are the only costs you have (and you should definitely NOT use a free provider, you will need assistance one way or another and then you will be thankful you have working customer support). Just click the link above and check out their current offers, they have an abundance of FAQs and tutorials to make your choice easier and help you get started.
3. Installing WordPress
Now, most of the people I talk to consider this to be the scariest part. You might be surprised but with most hosting providers this is a 1-click action. But first of all, what exactly is WordPress and what does it do for you? WordPress is (one of many) Content Management Systems (CMS) that helps you to store, manage and customize your content so the visitors of your website can enjoy a great user experience. A CMS enables you to maintain a website without programming skills and with templates for the layout and look (a so-called theme) you don’t even need design skills. Why WordPress and not one of the others like Joomla, Drupal, etc.? Because it is the most used CMS. This makes sure it is well maintained and have thousands of free and paid add-ons to choose from to suit your needs.
So let’s take a look how to install WordPress. Bluehost (or any other Provider) has a very good simple step-by-step tutorial to follow. Here is the simple list of steps:
- Log into your Bluehost account
- Go to the Website section and select Install WordPress
- Click Install
- Choose your website name to install it to (dropdown, you will see your domain name there)
- Click advanced options and enter a valid email, a username, and a password. Make sure you remember the credentials and pick a secure password otherwise anyone can hack your website and make changes!
- Check the license agreement boxes
- Click install now
Done!
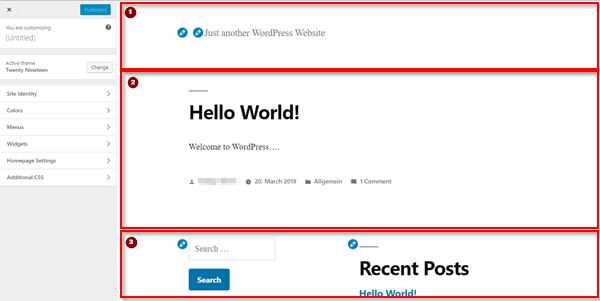
That was easy, wasn’t it? So now what? Now your website is already up and running. WordPress installs a default homepage (Just type in your domain name into any browser) and you will see your site. Awesome! Now let’s get into the details on how to change the look, customize everything and install our Quiz.
Ok, we have installed WordPress… but where did it all go? A WordPress installation provides you with 2 “sides” of your website: The frontend, that is what everyone sees under http://www.yourwebsite.com and the so-called backend which allows you to edit, configure and customize what the user sees on the frontend. Go ahead, open a browser and type in the URL (The link) of your website, you should see a default Website with a standard “Hello world” post. Wow, you just got your website up and running – now let’s make it look good.
4. Accessing your backend
If you are using Bluehost there are several ways to get to your backend (which are described here). I would recommend to always use the default way which is independent of any hosting provider. The standard way to access a WordPress backend is to append /wp-admin (or /login) to the URL of your website. Go to http:/www.yourwebsite.com/login (1) and you should see the following login screen:
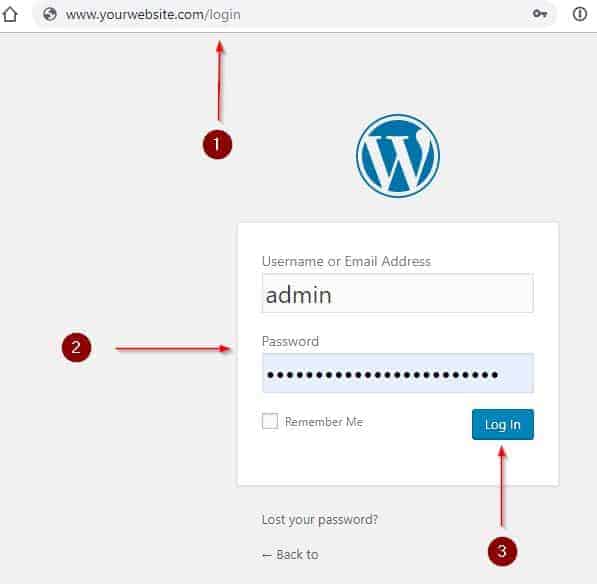
Now enter the credentials from the installation process (2) and press login. In case you really forgot your password already you can click on “Lost your password” and enter the email address from the installation (Must be the same!). You will then receive an email with instructions to change your admin user.
Once you have logged in successfully you will see the Dashboard, the overview of your backend:
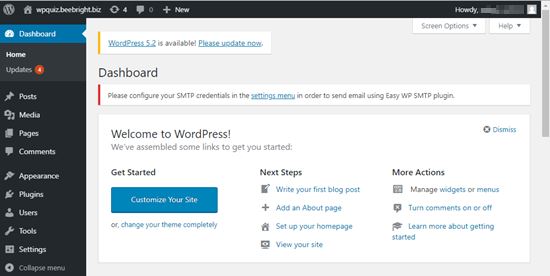
For those of you who have never seen this before let me quickly walk you through the menu items on the left.
Dashboard: This link always brings you back to the “Home” of your backend. This overview contains news, update notifications or summaries that other plugins display there. Some of the panels offer a “Dismiss” button (like the Welcome Panel) which you press to get rid of unwanted dashboard items.
Posts: This will show you a list of posts. A post is one article on your website with images, comments and structured information you present to your user. In the beginning, you will find the “Hello World” article there which is currently displayed on your frontend. We will explore this section further when we go to publish our first quiz.
Media: As the name suggests this item shows you a gallery of all the images, sounds, videos or other files you use in your posts or anywhere else on your website. For now, this should be empty.
Pages: Pages are usually used to display static content like Terms of Service, Contact forms, About me or other pages that are most likely written once and do not change much. The difference to posts is that pages usually do not show a date, author, comments and they are also not used in previews on the homepage. (Of course, you can do that if you like because WP does allow you to customize everything but this is how the majority of bloggers do it)
Comments: Here you can manage, block, delete comments users write below your posts (if you allow commenting, I usually don’t)
Appearance: As the name suggests this sub menu is responsible for adjusting the design of your website. You can change the whole look and layout by changing the design template (The so-called theme). This just changes colors, layout and can add a complete suite of customization but leaves your content intact (means you posts, pages, plugins, and media will not be touched when you change the theme. Furthermore you can customize the theme, menus and widgets in this section. Widgets are little “Helper blocks” you can put inside of your posts, pages and sidebars for a specific functionality (like e.g. an email subscribe button). We will do some adjustments in this section later.
Plugins: As mentioned before, this section allows you to install additional components to add specific features to your site.
Users: Allows you to change/manage users. For now there should be only one user which is you admin.
Tools: Allows you to import, export content. This is seldom used. We will install a complete backup solution to protect your site.
Settings: Here you can change and manage the behavior of your WordPress installation. So lets get started and adjust some important settings.
5. Customize your WordPress installation
Now that you have a basic understanding of how a WordPress installation looks like it is time to get rid of the default settings before we get started with additional features. So the first thing we do is go to the settings tab. The easiest way to adjust your settings is to go to “Appearance->Customize”. You will see something similar to the following:
Now you have many options on the left to change how your website will look like and an editable preview on the right side. The active default theme (In this case Twenty-Nineteen) – remember a theme is the combination of fonts, colors, and layout in one package – is divided into 3 blocks: 1. Header (Usually used for the title, menu, logo) 2.Main body (Shows the main content), and 3.Footer (Used for credits, legal stuff, follow me buttons and so on).
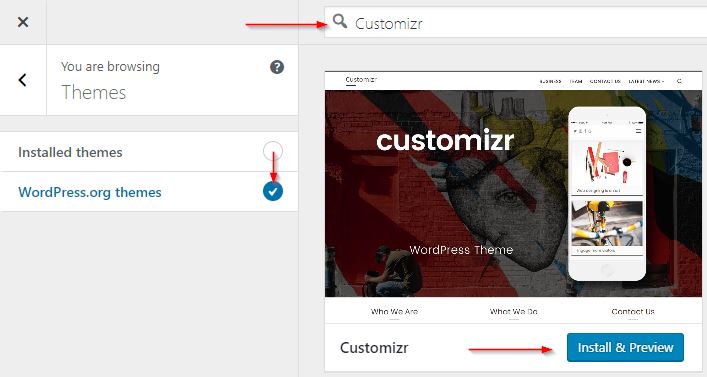
Let us begin by changing the theme to my favorite free theme which includes much more options. So go ahead and press the change button next to the “Active theme” row. Now change the option on the left from Installed themes to WordPress.org themes. You can see that immediately hundreds of themes appear. Later on, f you feel more confident you can change them to anything you like. Just remember that many themes are free but require you to pay if you want the full functionality. The “Customizr” theme which I use comes with everything right out of the box and though there is a paid upgrade the free version has everything we need. So type “Customizr” into the search box (yes, without the e). You should see the following:
Press Install & Preview and wait until the theme is downloaded and the preview is showing. Once that is finished you will see an “Activate and Publish” button on the upper left side. Click it and your new theme is live. You can see already that it looks much better and has a lot more explanations of what all the options on the left side are for. You can play with all the options and adjust the settings to your liking. As long as you do not press the publish button on the upper left you can always go back.
The only thing we are going to change now is some of the global settings. So click on “Global Settings” on the left side. Then again click on the first item “Site identity”. Change the details according to the following picture:
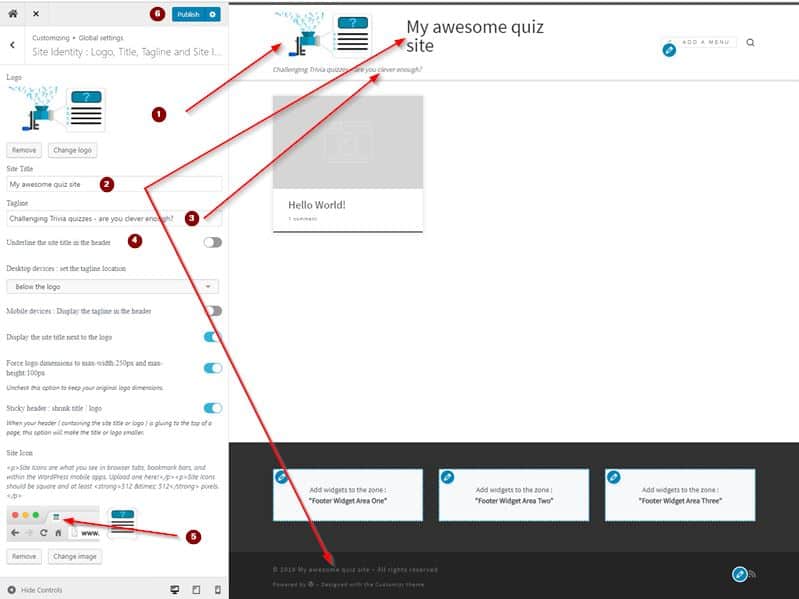
- Pick a nice logo for your site (250×100 pixels) by clicking on select logo, follow the instructions to upload a jpg or png file from your computer. All images will end up in the Media gallery we discussed earlier.
- Change the site title, it will appear in the header, footer and your browser tab
- Change the tagline, what is your quiz website all about?
- Switch off the line under the title (Just a personal preference, you can leave it on
- Choose a so-called Favicon (512×512 pixel), that is the tiny icon you see next to the site title in the browser tab
- Now click Publish to make the changes permanent.
That looks much better already doesn’t it? Before we customize the looks any further let’s install some additional functionality for our website. Probably take a break here a play a little with the other settings, enter your social media profiles, change the colors, fonts, and experiment with the other Global settings. Later we will add a menu, some footer items and a nicer way to present our quizzes on the front page.
6. Automate the installation of plugins
The next thing we need to do is to install some plugins to add the functionality we need for our quiz. What is a plugin? A plugin is a small piece of code that integrates into WordPress and provides additional features. There are thousands of plugins to choose from (I will show you where to find them in a minute). As I just mentioned there is probably a plugin for everything, even for installing plugins. So I created a list of handpicked plugins that you need to get your quiz site running and automated the process of installing them to save you from the tedious search, download, install process. If you are confused now let me just walk you through it:
Installing the automation plugin WP-Core
As explained earlier, a plugin is a package (usually a zipped file) that can be uploaded to your site and provide additional functionality. A normal WordPress site usually has between 5 and 15 extra plugin depending on the purpose of the website. We will install out first plugin now: WPCore. Click on Plugins on the left side and press Add New (1). Now type “WPCore” into the search bar. You should see something like follows:
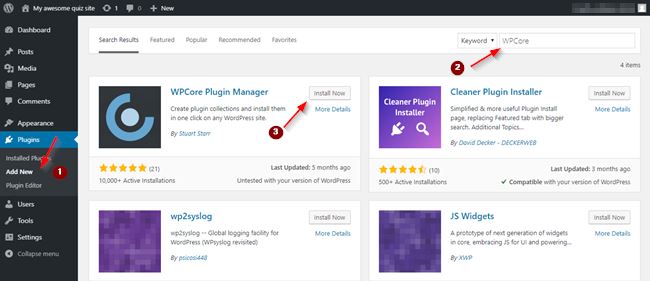
Find the WPCore Plugin Manager and click install now, the button changes to “Installing”. Wait for the install to finish, the button turns blue and shows “Activate”. Click on it and after a few seconds your plugin is running and you will be taken to the list of installed plugins. Depending on where you got your copy of WordPress a couple of plugins are already pre-installed. Now is the time to tidy this up.
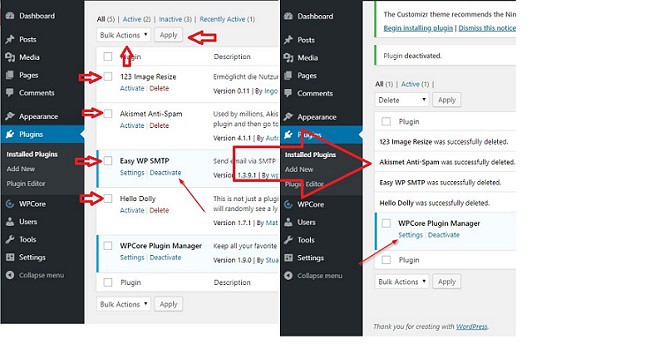
- Deactivate everything EXCEPT the WPCore Plugin Manager (Click on the Deactivate link), Plugins that do not show that link are already deactivated
- Mark all the deactivated plugins
- Change the Bulk Actions Dropdown to Delete and press Apply
- The plugins will be deleted one-by-one
Now press the Settings link of the WPCore Plugin, that should take you to the following page:
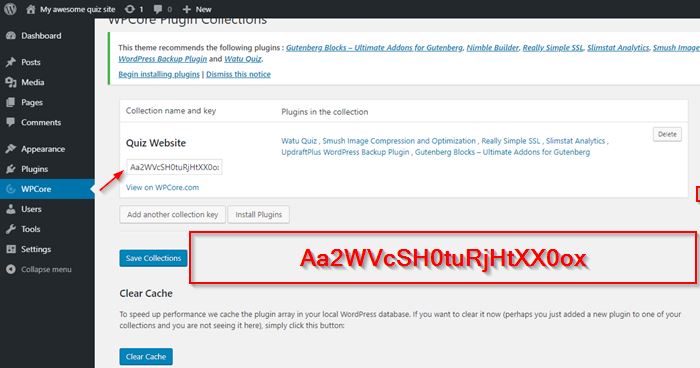
Press “Add a collection key” and enter the red code into the input field that shows up. Press save Collection and the plugin automatically checks the pre-configured list of required plugins that I created for you. Now press “Install Plugins” and wait. This is really a huge time saver. WPCore puts all the right plugins in the list of plugins and takes you there. Mark them all, change the Bulk Actions Dropdown to Install (The same dropdown you used for Delete before) and press Apply. WordPress will now download all the plugins and install them for you! Just sit back and watch it work.
7. Configure the plugins
Now that we have all the features we need we will go through each plugin, activate and configure it and see what it does.
UpdraftPlus
Probably the most important of all that many people don’t think about. This plugin makes regular backups of your website so if anything goes wrong when you are taking your first steps with your new quiz website you can always go back. So, go to the list of plugins and press Activate right underneath the UpdraftPlus – Backup/Restore entry.
UpdraftPlus is very easy to use, once you have clicked on “Activate” it takes you on a tour and helps you to create your first backup. Choose a schedule (Just go with the recommended setting). Now it asks you where you want to store the backup file. As you can see there are many options to choose from. If you do not have an account with any of those cloud providers just pick Google Drive (it’s free). After a couple of “Next” you will see the “Save Changes” Button which you should press. A popup opens that will guide you through the authentication process with your cloud provider (The company that will store the backups for you e.g. Google Drive). Click on the link.
Now you will taken to Google Drive which will ask you to confirm that the UpdraftPlus Plugin from your website is allowed to have access to your Google Drive. Confirm it and you are done! You just configured automatic Backups.
Once you are back at your website press the blues Backup Now button, confirm the Popup and watch. Now you are safe and sound.
Smush
Smush is a plugin that compresses all the images on your website. Why is this important? A huge factor when it comes to Google ranking is site speed. So if your website and your quizzes load very slowly your quiz website will not rank high in search results. Smush does 2 things, it checks all your existing images for optimization possibilities and compresses every image automatically that you upload to your site. So once Smush is activated there is not much to configure. Go to the list of plugins and click Activate next to the plugin, it will take you on a “Welcome tour” if you like (Probably just go with it to see what this plugin is all about). You can leave all the setting as they are.
Really simple SSL
This one is not only an important Google ranking factor but s security plugin which anyone should use. Especially when you are trying to monetize your site or quizzes a secure connection is required. But what does it do? To put it simply, this plugin forces your website to always use encryption. Did you ever notice a small green lock in your browser bar next to the URL or the https instead of http at the beginning of an URL? Or even worse, a warning that shows up telling you a site you want to visit is not secure? That is exactly what this is all about. The plugin forces all visitors to use https://yoursite (which is encrypted) instead of http. But there is something else you need to do, just activating the plugin is not enough. You need to have a so-called SSL-Certificate. This certificate authenticates the identity of your site and makes sure the connection between your visitor’s browser and your webserver is encrypted. Years ago this was very expensive because you had to buy those certificates from 3rd Party providers but nowadays all hosting providers include a free SSL solution when you buy their hosting services (Bluehost does).
If you didn’t understand a word I just wrote don’t worry, just follow a couple of simple steps to activate the certificate on your provider’s website. For Bluehost, it’s as simple as:
To enable the free SSL certificate:
- Log into your Bluehost control panel.
- Click the Addons tab.
- Locate SSL Certificates, and click on the learn more button.
- Click the get started button under WordPress Free SSL.
- Click the Install button
You usually need to wait a while, Bluehost will send you an email when this is completed. After that just activate the Really simple SSL plugin and you are done.
Slimstat Analytics
You definitely want to monitor and see how your quizzes are doing right? I tried many analytics plugins and found this to be the best. It shows you all the details about your posts, pages, visits, and clicks and helps you to identify which of your quizzes are doing well, where your visitors come from and what they do. This is especially helpful if you want to monetize your quizzes either by showing adds or sell the quizzes. Go to your plugins list and click Activate. Since your site is brand new there is, of course, no data available yet. Slimstat will create a new menu item on the left site which lets you access all the statistics. Additionally, it creates overview charts on your dashboard. Go ahead and check it, you can reorder what you want to see and where you want to place it, just Drag and Drop the panels wherever you like.
Nimble Page Builder + Ultimate Addons for Gutenberg
The page builder is an Addon to the Customizr theme and allows you to visually move blocks and widgets around. Ultimate Addons for Gutenberg is an enhancement of the current WYSIWYG editor Gutenberg that was introduced with WordPress 5. Both of these plugins are not really necessary to create our quiz site. I included them because a quiz site or exam preparation site will not rank very high just by itself. You should definitely create some content around you quizzes, write some posts about the topic your quizzes are about just to attract more visitors. I found that Customizr+Nimble+Gutenberg+Ultimate Addons provides the best free solution to create a beautiful website around your quizzes.
Watu Quiz
Finally, let’s get to the reason you probably started reading this post. Go to the list of plugins again and Press activate. WATU Quiz creates a new menu item on the left and even adds a first demo quiz.
Going over the plugins was hopefully not too fast. If you did not understand every detail of it just leave them for now as we have set them up. Later on, you can try and work with those other plugins. I just found it important not to leave you with a naked WordPress installation and a quiz plugin. Now, let’s create our first quiz in more detail, shall we?
8. Create your first quiz
The WATU quiz plugin comes in 2 versions, free and PRO. You can see all the features you get when you upgrade on the plugin tab in WordPress. For now, let’s create a new quiz with the free version.
Press the WATU Quizzes link on the left side, you can see the demo quiz (You can delete it if you want). Press the “Create new quiz” link. You will see a lot of options to choose from, for now, we just tick the following options (you can always change and edit the settings later).
Quiz name an setting: Give the quiz a name and enable “Randomize questions” and “Randomize answers”. We will create a English, German vocabulary quiz so I give it the name “The 100 most common English words in German”.
Anti-Spam measures: Use a “honeypot” field (What this does is it includes a user-hidden field in “Submit quiz” form, Spambots (little pieces of software that will try to Spam your quiz site) will fill this out as well with the visible fields, this way the quiz plugin knows this was not a valid user). If you still get Spam (because the bots will get smarter) you can always switch to the Captcha, unfortunately, users have to type in an answer to a simple question each time they submit a quiz to verify they are human.
The remaining setting can be left as they are, you can tweak your “Final page” if you like, just make sure if you touch any of the %% enclosed fields that you spell them correctly. These fields will be replaced with content when the users get to see this page. A list of all available options are outline at the bottom of the page.
Hit save and your quiz will be created. The plugin now takes you to the “Questions” page. You can enter individual questions and later edit them here but I find that rather tedious. So let’s go ahead and import questions from an Excel or Open Office sheet.
9. Import quiz questions
To import a list of questions you need to create CSV (Comma separated values) in a specific format (Means the columns need to be in a certain order with a specific headline). Calenderscripts (The creator of the plugin) provides an example file and a description of how the file has to look like which you can find here.
You need to create one row for each question. In each row you need to have the following columns:
Question: This is the text of the question. It can contain HTML elements (To style it, when you enter the question in WordPress you can simply use the editor to style your question). For most cases, simple text is fine, especially when you are creating an exam you don’t want to include ant fancy styling).
Answer Type: WATU provides different type of answers like Single choice (only 1 answer is correct), Multiple Choice (1 or more answers are true) and Free text questions. The identifiers for these Answer types are radio (Single choice), checkbox (multiple choice) and textarea (for free text). Make sure you spell them exactly like this otherwise the importer will not recognize it. For our example we will only use “Radio” questions, every English word has exactly 1 correct answer.
That is it for the questions part already, now we need to input answers. this is done by repeating a 3 column block for as many answers as you like to include for each question. the required fields are:
Answer: An answer text, can be correct or wrong
Is correct?: Is this the correct answer? You need to use 0 for wrong and 1 for correct
Points: How many points does the user get when picking this answer? This can be useful if you have a quiz with different difficulties and you want to reward users for getting the hard questions right.
Now repeat this block for as many times as you like. The first row of our table should look like this for the English word Apple.
| Question | Answer Type | Answer | Is correct? | Points | Answer | Is correct? | Points | Answer | Is correct? | Points |
| What is the German word for Apple? | radio | Tisch | 0 | 0 | Apfel | 1 | 1 | Haus | 0 | 0 |
To make this a lot easier for you I prepared a ready to import CSV file for you which you can download here. If you like to convert simple lists from the internet or other sources and turn them into WATU quizzes and automatically create all the wrong answers you can check out my Apps and Post about it here – saves you a lot of time.
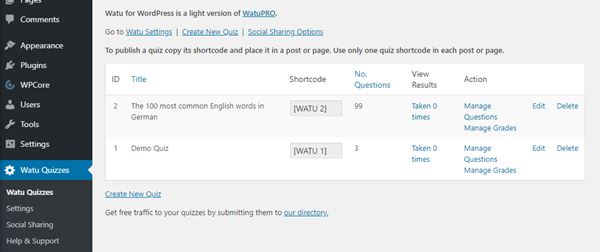
Now, back to the plugin, hit the Import questions link, press the Choose File button and look for the file you just created or downloaded. Press import questions. If you go back to the list of quizzes you should see something like this:
10. Show the quiz on your website
Now we are finally ready to try our quiz. To do this we have to create a new post and insert a quiz into it. Let’s see how that works. Go to the list of Posts. Before we create a new post with our quiz let’s delete the “Hello World Post”. To do this just hover over it and click on the red Trash link.
Now press the “Add new” button to create a new post. This opens the editor for a new post. Enter a descriptive title and in the first paragraph just add [WATU 2] (That is the Shortcode to your quiz which you can always find in your quiz list in the Shortcode column ((See image above). What is a shortcode? This is basically a placeholder for something. WordPress replaces it at runtime with whatever it represents, in our example the quiz.
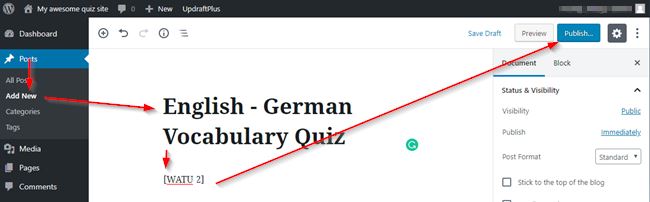
Now press the blue Publish button and your quiz goes live. When you go to your website it should look something like this.
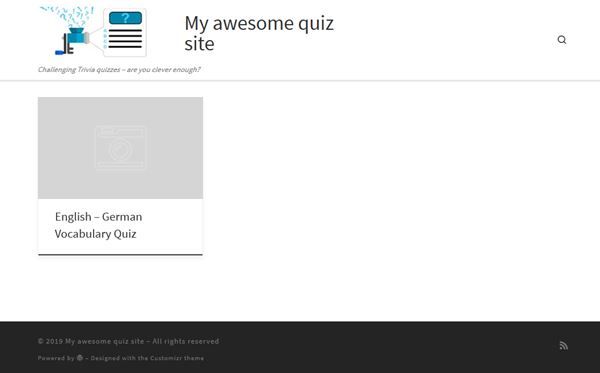
Now when you click on the box your quiz should start. You made it all the way through, Congrats! There is still plenty to do, this is not the most attractive quiz website (yet).
11. Where to go from here?
The next step would be:
- Add a featured image to your post so the quiz has a logo or preview image.
- Add a menu and link to all of your quizzes
- Create some more quizzes
Further down the road you could add advertisements or create a member login and charge for the quizzes. If you are interested in simplifying you quiz creation by turning simple Excel lists into multiple choice quizzes you can read my article about it here. Thanks for staying with me throughout this post. If you are interested in a detailed Udemy course on this topic let me know in the comments below. I am offering this as a service, contact me if you need a professional (commercial or not) quiz website.